
Wednesday, October 29, 2014
a touch of fall
In honor of my favorite season, I thought I would just share a wallhanging I sewed and quilted years ago. Happy Fall, friends!
personalized vanity
As a little girl, I always wanted a vanity. Of course, back then I had a little different taste and wanted a huge bright one that all the glamorous stars supposedly have to do their stage make up and hair in front of. Thankfully as I got older, my taste got a little better, but I still wanted a vanity so I decided to just make my own. Not too long ago, I was out thrifting with a friend and found an old sewing machine table at the Goodwill for only $26. For those of you who do not know, antique sewing machines actually fold up until a small desk. I knew that not only was it a unique find, but it would be just perfect to use as my a vanity and I could create my own.


I first sanded the table, inside and out. Then I painted it with my favorite type of paint: Annie Sloan's Chalk Paint. While this paint is difficult to find, it is definitely worth the search. It is often sold in antique stores. I recommend checking out her website and seeing if there are any locations near you that hold it: www.anniesloan.com. She also gives really helpful tips if you are having a hard time using her product. I will warn you it is a bit pricey, but I would like to also emphasize that a little goes a long way with this type of paint. After a few coats of paint, I lightly sanded edges and the top of the table to give it an antique touch. I then finished it with a coat of Annie Sloan's wax. It isn't necessary, but it definitely gives it a nice finished touch.
Last, but not least, I added a mirror and a chair and my sewing table became my own personal vanity.
Thursday, January 9, 2014
doily dreamcatcher


There are all kind of different materials you could use to make this so use your imagination. I used an embroidery hoop, a doily, yarn, lace, pendents, feathers, and seashells, which I found all at Joanne's craft store. The first thing I actually did was dip feathers in a gold metallic paint and laid them out to dry.

Then I started on the actually dreamcatcher itself by attaching the doily to my hoop. Looking back, I could have probably done it in zigzags to give it more of a dreamcatcher look, but this is how I did it:

Then I took my strips of lace and yarn and attached it to the bottom so it would look cleaner in the end.

Then I simply wrapped the entire hoop with yarn.

Now you can decorate it however you want! I added two more hanging strands to the bottom. I wanted a variety of things hanging so I braided strands of yarn. Then I hot glued seashells and starfish to my strips of lace and tied little bottles and feathers to the single strands of yarn.

I also sewed bird pendants to my doily like this:

This is just how mine turned out, but you could really attach all kinds of things to your dreamcatcher to make it your own.
Thursday, December 19, 2013
hair bows

Go to a fabric store and pick out some of your favorite fabrics.

I just got a quarter of a yard of each fabric and was able to make multiple bows with each one. Cut two strips of the fabric, one larger than the other like this:

I recommend using fabric scissors if you have them. The measurements of each fabric really just depend on how large of a bow you want. I just eyeballed it and played around with it. If you are concerned cut the strips larger. You can always cut them smaller later on. You will also be folding each fabric smaller, which brings me to my next step.

Fold in one side of the fabric, like the picture above, and iron it. Then do the same on the other side. You will do this to both pieces of fabric. Next, you will take the larger strip of fabric and fold both sides in like this:

Then pinch that piece of fabric in the middle...

and wrap the smaller strip around it. You will take a needle and thread and stitch it in place like this:

You could probably also use fabric glue if you don't know how to sew. The last step is easy. Just hot glue your bow to a hair clip, which you can find packs of at basically any craft store.

Tuesday, December 17, 2013
flower headpieces

These are so easy to make and not time consuming at all. You will need decorative flowers, ribbon, wire, wire cutters, and some type of glue. I used a hot glue gun, but next time I think I will use fabric glue. I would recommend using just one of those though. Fake flowers often come in a bouquet like this:

You can use wire cutters to carefully cut them off. Next take your wire and cut a piece long enough to start/end from behind your ears. Here's a picture of the finished product, but untied, to give you an idea:

Take the cut wire and bend it so it fits around your head snug. It should look something like this:

Then cut two long pieces of ribbon and glue one strip to each side of the wire. You will end up tying a bow in the back when wearing so make sure each strip will be long enough to do so.

Now take a new piece of ribbon and tightly wrap it all around the wire. You will want to put glue on the wire as you wrap it. When finished it should look like this:

The last step is the fun part. Simply glue flowers all around the wire however you want! This is how mine turned out:

Once the glue is dry, you can finally wear it and find your inner flower child!

Tuesday, December 10, 2013
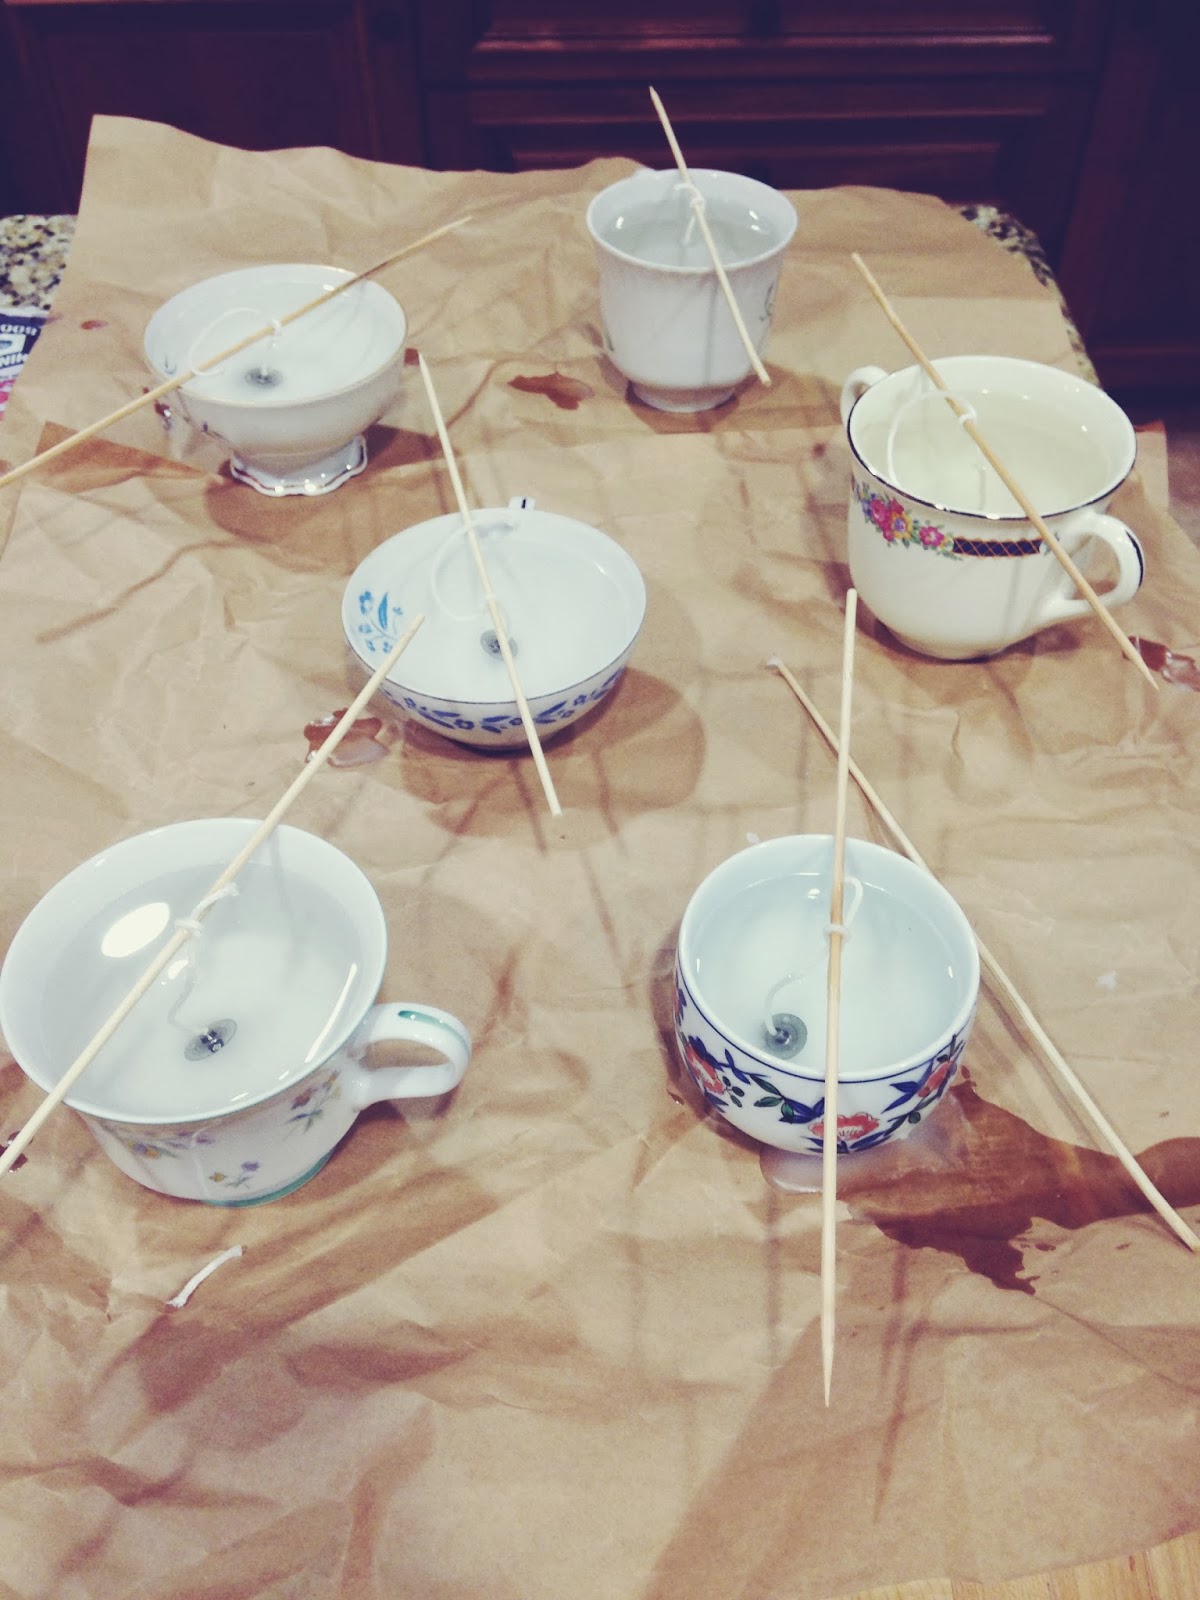
turn old teacups into candles
Before:

After:


If you don't have any old teacups lying around the house, go to a thrift store. I can almost guarantee that any you go to will have some that will be just perfect. I found mine at the Goodwill and each one costed less than a dollar. Then find some candles to melt, or use the leftovers of old ones and scrape them out. You will also need to get candle wicks and wick sustainers, which you can find at a craft store, skewers, and a large empty tin can. I used an old coffee can. Put your candles or candle scrapings in the coffee can. You will be melting them in there. To make pouring the hot wax easier later on, try to bend the can if possible. Take a large pot and fill it with an inch or two of water. Let the water boil. Once it boils, carefully stick the can into the water, turn the heat down to low, and let it simmer. You could probably also use a double boiler as well, but wax is hard to clean out so I would just recommend using a tin can.

This will take awhile for the wax to melt. In the meantime, attach your wick and sustainers together. Tie them to the skewers and set them on top of your cups like this:

When the wax is fully melted, slowly pour the hot wax into your teacups. I recommend putting newspaper under your teacups beforehand. Wax can be very messy and hard to clean.
All you have to do next is just wait for them to cool and harden, untie the wick from the skewers, and cut the wick to your preferred length. Then you're done!
Saturday, October 26, 2013
mermaid costume

Throughout the years I have made many costumes. This is one of my favorites and it was so easy to make. I just bought a lace bandeau bra and put a starfish in the middle with fabric glue. You can find starfish as well as other shells at just about any craft store. I got mine at Michael's in the decorative aisle. For the skirt/fin, I used a stretchy fabric with sequins and sewed it into a skirt. It's an easy sew, practically a straight line, but for those who do not sew you could easily wrap it around yourself twice and safety pin it from the inside. I found the netting at Michael's as well. I cut mine into a large triangle that was large enough to wrap around my waist. I glued starfish and seashells all over it. The netting is not stretchy, so I recommend just using safety pins to attach to your skirt and put it on last. Just add a flower to your hair and you'll be the prettiest mermaid out on Halloween night!
Subscribe to:
Posts (Atom)