Saturday, May 18, 2013

turn pants into shorts

Before:


After:


Find an old pair of pants that you don't wear anymore or find a new pair at a thrift store. I found these old Levi's at a thrift store. Levi's are my favorite to work with, especially if you are interested in high waisted shorts.  Old Levi's tend to run quite small so don't be afraid to try on a larger size.  For example, I'm normally a size 0 (or 24) and these shorts are a size 4.  They are only a little lose, but they still work.  Before you begin cutting, I recommend you try them on and draw a line where you want to cut while wearing them.  I also recommend drawing the line a little bit lower than you actually want your shorts to be.  You can always trim shorter, but once you cut them you can't make them longer if you mess up and make them too short.  I'm a bit of a perfectionist so when I take them off, I take a ruler and make sure the line is straight and even.  I also would like to point out that the back of your shorts should be longer than the front so your butt does not hang out.  Once you have your lines all drawn out, cut away.  Fabric scissors tend to work better, but normal scissors will do if you do not own a pair.  Your shorts will look something like this after cutting them:


After you try them on and figure out if the shorts are at a good length, you can begin the process of fraying your shorts.  To do that, slide the blade on your scissors back and forth along where you trimmed the pants. Do this for a while until it is frayed all around.  It won't look perfect until after you wash and dry them.  That is when they really fray.  If you want to create holes in your shorts, or make them look worn out, you can use either sand paper or a cheese grater to do so.  Just rub the shorts in the areas you wish to do so with either the sand paper or cheese grater.  I didn't do that with this pair.  Instead I put studs on them, which can be hard to find sometimes.  I got mine from the Hobby Lobby, which is a craft store.  If you are unable to find some at your local craft store, you can always find them online.  Etsy.com is good for things like that.  I recommend buying some that have prongs in the back like this:


That way you can just poke them into your shorts.  Otherwise make sure you find a durable fabric glue if you use studs that don't have prongs.  

Friday, May 17, 2013

graduation cap


Might have taken me two tries to graduate, but I'm finally there! I kept mine pretty simple and just used fabric markers, white fabric pencil, and glitter.

Monday, March 11, 2013

spray paint random objects

Before:

After:

Before:

After:

Before:

After:

Before:

After:

Find random objects at a thrift store and spray paint them with Rust-oleum spray paint.  Be careful when using this kind of paint.  It can be really messy so be sure to do it outside with newspaper underneath.  Make sure you shake the bottle really well otherwise it might come out powdery.  Also, don't spray too closely otherwise it'll get runny and drip marks might form. When they're dry, put them around your house and you have new decorations!


Thursday, February 28, 2013

mirror makeover


Old mirrors are one of my favorite things to look for when shopping at a thrift or antique store.  Find one with a unique frame and paint it something fun with Rust-oleum spray paint.  Before spray painting your frames, I suggest you cover the mirror up completely with newspaper and blue painter's tape so it looks like this:


Once there is no mirror showing, spray away. Don't spray too closely to the frame though, otherwise it will be runny, and bubbles or drip marks will form. After the paint has dried, pull off the tape and newspaper and your mirror will look completely new. 


Monday, February 25, 2013

repaint old furniture

Before:


After:


Before:


After:


Before:


After:


You can give any old piece of furniture a new unique look, whether you want it to look brand new or have an antiqued look by painting it with Annie Sloan's Chalk Paint.  Unfortunately, this paint can't be found everywhere.  I've found it in antique stores, but if you are unable to find it at a store near you, you can go to her website: www.anniesloan.com.  Not only will you find her paint on there, she has tips on how to use her product properly.  I highly recommend using this paint.  It is very easy to use and the best part is that you don't have to sand down your furniture before you start painting, nor do you have to use a primer first. It's also easy to clean up so you can do your projects inside your house, without the worry of getting paint everywhere. If you want to make your furniture look brand new, paint as many coats as it takes to get your desired color. You will want to make sure the paint dries between each coat.  Fortunately, this paint dries pretty fast. Once you are finished, you paint on a coat of Annie Sloan's wax. If you want your furniture to have an antiqued look, sand the furniture lightly before you put on the last coat of wax.


Sunday, February 24, 2013

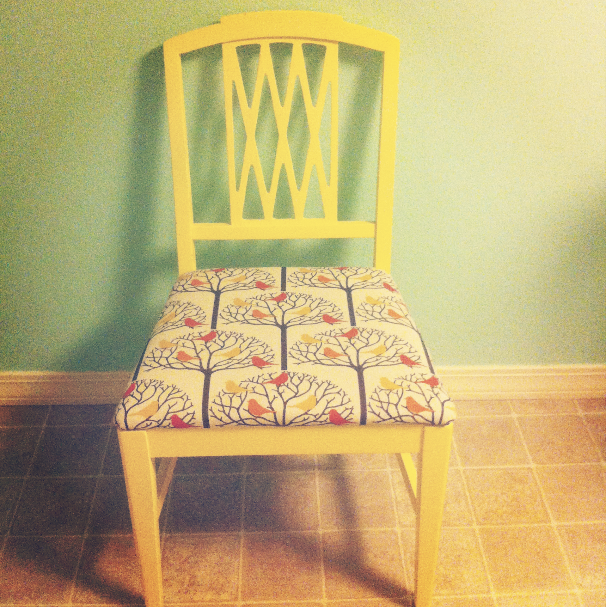
give an old chair a makeover


You can make just about any old chair look brand new with some Rust-oleum spray paint and new fabric.  Before painting, you will have to take the cushion off, which shouldn't be too difficult on most chairs.  If you flip the chair over you will see that it is just screwed to the chair. Just make sure you don't lose the screws! If the chair is a dark color, I recommend making the first coat a primer or white paint before you paint it with the color of your choice. Spray paint is easy, but it can be messy so be careful where you choose to do this and definitely put some newspaper or a tarp underneath it. Also, be careful to not spray too closely to the chair, otherwise it will be runny and bubbles or drips will form. Then simply fold the new fabric over the cushion tightly so that it is fitted and staple it with a staple gun underneath.  Then screw the cushion back in and your chair will look totally brand new.

Wednesday, February 20, 2013

feather headbands


Why spend $20 on a headband at Urban Outfitters when you can make one yourself? You can find packs of feathers at basically any craft store, such as Michael's or Joanne's.  Sometimes they even have feather pieces already made and put together, but I personally think it's more fun to do it yourself. Take a basic headband and decorate it with feathers, using a hot glue gun. Hot glue can be messy though, so if you aren't used to using one, a fabric glue can work as well. You can also add sequins or jewels on them as well. For the second headband, I wrapped the middle of the feather piece with a sequined ribbon to add to it.