Thursday, December 19, 2013

hair bows


Go to a fabric store and pick out some of your favorite fabrics. 


I just got a quarter of a yard of each fabric and was able to make multiple bows with each one. Cut two strips of the fabric, one larger than the other like this:


I recommend using fabric scissors if you have them. The measurements of each fabric really just depend on how large of a bow you want.  I just eyeballed it and played around with it. If you are concerned cut the strips larger.  You can always cut them smaller later on.  You will also be folding each fabric smaller, which brings me to my next step.


Fold in one side of the fabric, like the picture above, and iron it. Then do the same on the other side.  You will do this to both pieces of fabric.  Next, you will take the larger strip of fabric and fold both sides in like this:


Then pinch that piece of fabric in the middle...


and wrap the smaller strip around it. You will take a needle and thread and stitch it in place like this:


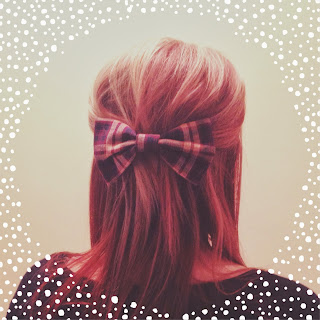
You could probably also use fabric glue if you don't know how to sew. The last step is easy. Just hot glue your bow to a hair clip, which you can find packs of at basically any craft store.


Tuesday, December 17, 2013

flower headpieces


These are so easy to make and not time consuming at all. You will need decorative flowers, ribbon, wire, wire cutters, and some type of glue. I used a hot glue gun, but next time I think I will use fabric glue.  I would recommend using just one of those though. Fake flowers often come in a bouquet like this:


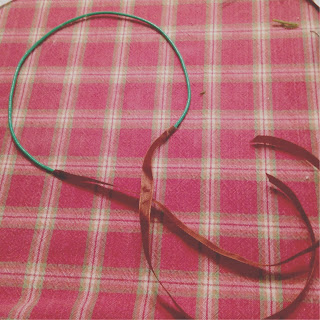
You can use wire cutters to carefully cut them off. Next take your wire and cut a piece long enough to start/end from behind your ears. Here's a picture of the finished product, but untied, to give you an idea:


Take the cut wire and bend it so it fits around your head snug. It should look something like this:


Then cut two long pieces of ribbon and glue one strip to each side of the wire. You will end up tying a bow in the back when wearing so make sure each strip will be long enough to do so. 


Now take a new piece of ribbon and tightly wrap it all around the wire. You will want to put glue on the wire as you wrap it. When finished it should look like this:


The last step is the fun part.  Simply glue flowers all around the wire however you want! This is how mine turned out:


Once the glue is dry, you can finally wear it and find your inner flower child!


Tuesday, December 10, 2013

turn old teacups into candles

Before:


After:


If you don't have any old teacups lying around the house, go to a thrift store. I can almost guarantee that any you go to will have some that will be just perfect. I found mine at the Goodwill and each one costed less than a dollar. Then find some candles to melt, or use the leftovers of old ones and scrape them out. You will also need to get candle wicks and wick sustainers, which you can find at a craft store, skewers,  and a large empty tin can.  I used an old coffee can.  Put your candles or candle scrapings in the coffee can. You will be melting them in there. To make pouring the hot wax easier later on, try to bend the can if possible. Take a large pot and fill it with an inch or two of water. Let the water boil. Once it boils, carefully stick the can into the water, turn the heat down to low, and let it simmer. You could probably also use a double boiler as well, but wax is hard to clean out so I would just recommend using a tin can.


This will take awhile for the wax to melt. In the meantime, attach your wick and sustainers together. Tie them to the skewers and set them on top of your cups like this:


When the wax is fully melted, slowly pour the hot wax into your teacups. I recommend putting newspaper under your teacups beforehand. Wax can be very messy and hard to clean.


All you have to do next is just wait for them to cool and harden, untie the wick from the skewers, and cut the wick to your preferred length. Then you're done!


Saturday, October 26, 2013

mermaid costume


Throughout the years I have made many costumes. This is one of my favorites and it was so easy to make.  I just bought a lace bandeau bra and put a starfish in the middle with fabric glue. You can find starfish as well as other shells at just about any craft store. I got mine at Michael's in the decorative aisle.  For the skirt/fin, I used a stretchy fabric with sequins and sewed it into a skirt. It's an easy sew, practically a straight line, but for those who do not sew you could easily wrap it around yourself twice and safety pin it from the inside. I found the netting at Michael's as well.  I cut mine into a large triangle that was large enough to wrap around my waist. I glued starfish and seashells all over it. The netting is not stretchy, so I recommend just using safety pins to attach to your skirt and put it on last. Just add a flower to your hair and you'll be the prettiest mermaid out on Halloween night!


Saturday, May 18, 2013

turn pants into shorts

Before:


After:


Find an old pair of pants that you don't wear anymore or find a new pair at a thrift store. I found these old Levi's at a thrift store. Levi's are my favorite to work with, especially if you are interested in high waisted shorts.  Old Levi's tend to run quite small so don't be afraid to try on a larger size.  For example, I'm normally a size 0 (or 24) and these shorts are a size 4.  They are only a little lose, but they still work.  Before you begin cutting, I recommend you try them on and draw a line where you want to cut while wearing them.  I also recommend drawing the line a little bit lower than you actually want your shorts to be.  You can always trim shorter, but once you cut them you can't make them longer if you mess up and make them too short.  I'm a bit of a perfectionist so when I take them off, I take a ruler and make sure the line is straight and even.  I also would like to point out that the back of your shorts should be longer than the front so your butt does not hang out.  Once you have your lines all drawn out, cut away.  Fabric scissors tend to work better, but normal scissors will do if you do not own a pair.  Your shorts will look something like this after cutting them:


After you try them on and figure out if the shorts are at a good length, you can begin the process of fraying your shorts.  To do that, slide the blade on your scissors back and forth along where you trimmed the pants. Do this for a while until it is frayed all around.  It won't look perfect until after you wash and dry them.  That is when they really fray.  If you want to create holes in your shorts, or make them look worn out, you can use either sand paper or a cheese grater to do so.  Just rub the shorts in the areas you wish to do so with either the sand paper or cheese grater.  I didn't do that with this pair.  Instead I put studs on them, which can be hard to find sometimes.  I got mine from the Hobby Lobby, which is a craft store.  If you are unable to find some at your local craft store, you can always find them online.  Etsy.com is good for things like that.  I recommend buying some that have prongs in the back like this:


That way you can just poke them into your shorts.  Otherwise make sure you find a durable fabric glue if you use studs that don't have prongs.  

Friday, May 17, 2013

graduation cap


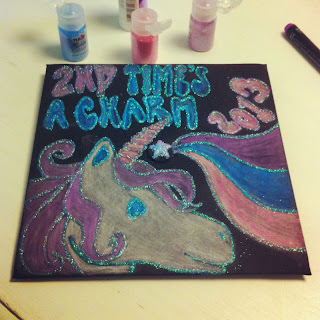
Might have taken me two tries to graduate, but I'm finally there! I kept mine pretty simple and just used fabric markers, white fabric pencil, and glitter.

Monday, March 11, 2013

spray paint random objects

Before:

After:

Before:

After:

Before:

After:

Before:

After:

Find random objects at a thrift store and spray paint them with Rust-oleum spray paint.  Be careful when using this kind of paint.  It can be really messy so be sure to do it outside with newspaper underneath.  Make sure you shake the bottle really well otherwise it might come out powdery.  Also, don't spray too closely otherwise it'll get runny and drip marks might form. When they're dry, put them around your house and you have new decorations!


Thursday, February 28, 2013

mirror makeover


Old mirrors are one of my favorite things to look for when shopping at a thrift or antique store.  Find one with a unique frame and paint it something fun with Rust-oleum spray paint.  Before spray painting your frames, I suggest you cover the mirror up completely with newspaper and blue painter's tape so it looks like this:


Once there is no mirror showing, spray away. Don't spray too closely to the frame though, otherwise it will be runny, and bubbles or drip marks will form. After the paint has dried, pull off the tape and newspaper and your mirror will look completely new. 


Monday, February 25, 2013

repaint old furniture

Before:


After:


Before:


After:


Before:


After:


You can give any old piece of furniture a new unique look, whether you want it to look brand new or have an antiqued look by painting it with Annie Sloan's Chalk Paint.  Unfortunately, this paint can't be found everywhere.  I've found it in antique stores, but if you are unable to find it at a store near you, you can go to her website: www.anniesloan.com.  Not only will you find her paint on there, she has tips on how to use her product properly.  I highly recommend using this paint.  It is very easy to use and the best part is that you don't have to sand down your furniture before you start painting, nor do you have to use a primer first. It's also easy to clean up so you can do your projects inside your house, without the worry of getting paint everywhere. If you want to make your furniture look brand new, paint as many coats as it takes to get your desired color. You will want to make sure the paint dries between each coat.  Fortunately, this paint dries pretty fast. Once you are finished, you paint on a coat of Annie Sloan's wax. If you want your furniture to have an antiqued look, sand the furniture lightly before you put on the last coat of wax.